My Easter tray decor 🥚🧺🐇🥕

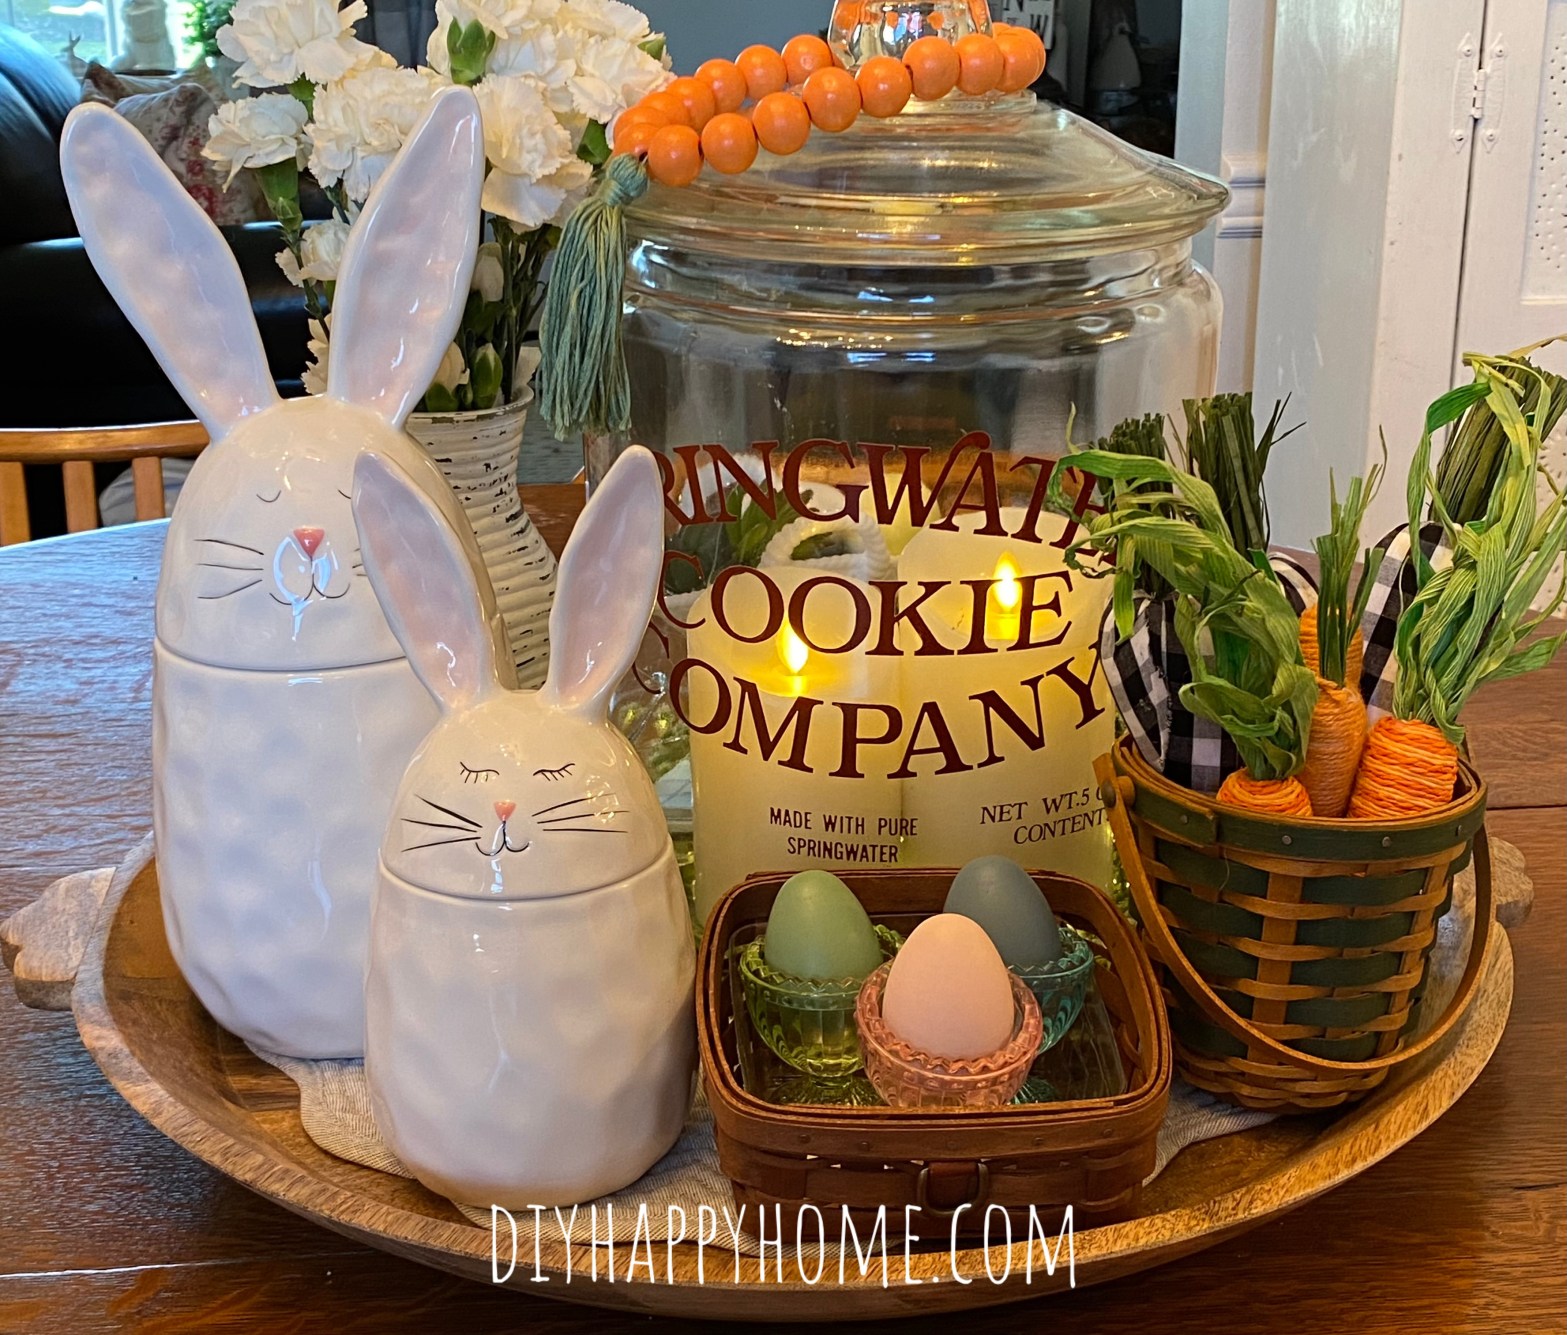
I had fun decorating my large wood Magnolia tray this year for Easter. I started by adding a gray quilted mat, and a faux green wreath with tiny white flowers. On top of the wreath, I added my antique Springwater Cookie Company jar. Inside the large jar is filled with two Luminara candles that are set on timers, some faux greenery with delicate white flowers, some timer set fairy lights, an antique white glass basket filled with faux succulents and pastel wooden eggs. I topped the jar with adorable carrot 🥕colored beads from Hobby Lobby.

My Easter tray decor

On the tray I added a tall, small green and brown Longaberger basket, filled with Black and white checkered carrots, and orange carrots. 🥕🥕🥕

I added a second Longaberger basket onto the tray and filled it with pastel egg cups from Hobby lobby. I used pastel wooden eggs to fill those beautiful glass egg cups.

I placed two bunny 🐇 canisters that I purchased from Qvc from 10 Strawberry Street. I filled them with different chocolate filled Easter eggs (don’t tell my kids they are in there, or they will eat them all, ha ha!).

Behind the bunny canisters is a hand painted vase from the dollar tree, painted in white by yours truly 😊. I filled it with fresh white mini carnations, I find carnations last much longer than your typical fresh cut flowers, so you get more bang for your buck. 👍🏻👍🏻

I have a quick Easter wreath that I am working on now. I cannot wait to show you! I will have the video for that up on YouTube shortly. Most items for it are from the Dollar Tree and it is super cute and easy to make. Stay tuned!

Have a great day!

Please like, share, and follow. Please also Follow my page on Facebook and Subscribe on YouTube. Thank you!


Thank you for the fun mail Rhodes Bread!

Thank you for the awesome “Home Baked Family Favorites” cookbook, kitchen towel, and Rhodes bread coupon. 💗 I can’t wait to try some new Rhodes Bread recipes. 🍞🍞🍞

Thank you for the fun mail Rhodes Bread!

#rhodes #funmail #rhodesbread #bread #ilovebread #breads #deliciousbread #yummybread

Please like, share, and follow. Please also Follow my page on Facebook and Subscribe on YouTube. Thank you!


Red Lobster Honey Butter Biscuit Mix: A Review

Red Lobster was super kind and saw my last review of their frozen ready to bake Cheddar Bay Biscuits review and sent me their new Red Lobster Honey Butter Biscuit mix to try. Check out my review!

Red Lobster Honey Butter Biscuit Mix: A Review
Red Lobster Honey Butter Biscuits​
Red Lobster Honey Butter Biscuits
Watch my son and I make Red Lobster Honey Butter Biscuits on YouTube ⬆️

My son wanted to help me mix them up. Little Chef did a great job being my helper! 👨‍🍳😊 They were super easy to mix up. Just add a 3/4 cup of water to the biscuit mix. The box said you could add in a 1/2 cup of cheddar for that classic biscuit flavor. I love cheddar, so I opted to do so. I added in a half cup of Cabot’s sharp cheddar cheese to the biscuit mix. Besides, cheese and honey go great together!

We mixed up the biscuits and the water until combined. Next, I added the sharp cheddar cheese to the biscuit mixture. The box said that you can get nine biscuits out of the mix. However, I’m making the biscuits in my Ninja Foodi air fryer, and it is a smaller cookie sheet, so I made eight larger biscuits. I divided the mix into eight similar sized biscuits, and placed them onto my parchment lined cookie sheet.

Ready to bake the biscuits in the Ninja Foodi Air Fryer.​
Ready to bake the biscuits in the Ninja Foodi Air Fryer.

I baked them in my Ninja Foodi air fryer for 15 minutes in bake mode at 425°.

While the biscuits were baking, I melted 1/4 cup (1/2 stick) of butter. I melted the butter in the microwave, however, the stovetop works too.

Mix the melted butter with the honey butter seasoning packet that came with the biscuit mix.

Red Lobster Honey Butter​ Biscuits Box Instructions
Red Lobster Honey Butter Biscuits Box Instructions.

Once the biscuits are done baking, use a pastry brush, or a spoon to coat the honey butter mixture over the top of each biscuit.

Look at those deliciously fresh baked biscuits getting brushed with honey butter! ​
Look at those deliciously fresh baked biscuits getting brushed with honey butter! 😋

Once each biscuit is coated in the honey butter, you are ready to enjoy!

Yum!!!​
Yum!!!

Thanks to Red Lobster for sending me the biscuits to try. My family of 5 loved them! 💗💗💗

Please like, share, and follow. Please also Follow my page on Facebook and Subscribe on YouTube. Thank you!


Double Smoked Glazed Spiral Ham on the Traeger

A sweet and tangy homemade glaze are featured in this tender DOUBLE smoked ham on the Traeger Grill. This is so easy and results in a moist, tender, flavorful ham. The glaze is so delicious! Try this for your next holiday celebration.

Double Smoked Glazed Spiral Ham on the Traeger
Watch me make Double Smoked Glazed ham on the Traeger Grill via YouTube ⬆️

Ingredients:

  • One spiral cut smoked ham (the ham I used was Sam’s Choice brand from Walmart)
  • 1 heaping Tablespoon of garlic paste
  • 1 1/2 Tablespoons of Grey Poupon mustard
  • 1 Tablespoon of vegetable oil, I used avocado oil
  • 2 teaspoons of apple cider vinegar
  • 1/2 cup of Peach and Apricot fruit spread (I used Cook’s Pantry Brand)
  • 1/2 cup of real Maple Syrup (i used Coombs family farm brand)
  • A pinch of salt
Double Smoked Glazed Ham​
Double Smoked Glazed Ham

Instructions:

  1. Preheat the Traeger Grill to 350°. Make sure there are wood pellets in the hopper.
  2. Make sure the pan you are going to use fits into the Traeger and that the lid will close.
  3. Unwrap the ham, pour any ham juices in the bottom of the pan. Using a sharp knife, carefully score the top of the ham intersecting the spiral cut (about a 1/4 inch deep), creating a diamond pattern for the glaze to seep through.
  4. Once the Traeger has reached 350°, place the ham on the grill, cover with foil and cook for 1 hour.
  5. While the ham is cooking, prepare your glaze in a saucepan on the stovetop. Add the garlic paste, Grey Poupon mustard, and vegetable oil to the pan. Next, add in the peach and apricot fruit spread, maple syrup, and apple cider vinegar. Heat on medium heat, stirring frequently, to cook the garlic and add a pinch of salt. Taste the glaze and adjust your seasonings as necessary. Take off heat.
  6. After the ham has cooked for one hour, remove foil, and glaze the ham with a silicone pastry brush, try to get the glaze between the ham slices. Reserve a little glaze to put a final glaze for when the ham is done. Cook uncovered for an additional 30 minutes at 375°.
  7. Next, crank the heat to 450° for about 10 more minutes, or until the ham is to your desired doneness. Put a final glaze on the ham so it glistens. Carefully transfer to a serving platter.

Enjoy!

What do you serve for Easter? What sides do you enjoy with ham? Please let me know in the comments.

Please like, share, and follow. Please also Follow my page on Facebook and Subscribe on YouTube. Thank you!


Need New Ways to Save? Check Out This Grocery Outlet Bargain Market Haul: Week of April 4, 2022

See what I purchased at the Grocery Outlet Bargain Market this week, April 4, 2022. It’s one of my favorite places to shop, especially with grocery prices going up!

Need New Ways to Save? Check Out This Grocery Outlet Bargain Market Haul: Week of April 4, 2022
Watch this awesome Grocery Outlet Bargain Market Haul on YouTube ⬆️

Thanks for watching! Let me know in the comments what deals you are finding at your Grocery Outlet Bargain Market.

Please like, share, and follow. Please also Follow my page on Facebook and Subscribe on YouTube. Thank you!


Homemade Chocolate Peanut Butter Eggs, Way Better Than Reese’s!

These are so good! They are a “must make” in my opinion. Once you have these peanut butter eggs, you will prefer them over Reese’s peanut butter eggs. Be warned, they are dangerously addictive!

Have fun decorating these delicious chocolate peanut butter Easter eggs!​
Have fun decorating these delicious chocolate peanut butter Easter eggs!
Watch me make Homemade Chocolate Peanut Butter Eggs on YouTube ⬆️
Yummy and cute! ​
Yummy and cute!

Ingredients:

  • 24 ounces of creamy peanut butter, I love Jif brand, don’t use Natural peanut butter for this recipe
  • 1/2 Stick of butter (4 Tablespoons), room temperature
  • 8 ounces of Cream Cheese, room temperature
  • 1.5 teaspoons of pure vanilla extract
  • 24 ounces of Confectioners Sugar (10X sugar), I used Domino brand sugar
  • 2 packages of Godiva Milk Chocolate Melting Wafers
  • 1 teaspoon of Salted Butter
  • Decorations of choice, such as sprinkles, different colored icings, and different sugary adornments
The finished chocolate peanut butter Easter eggs. Aren’t they cute?!​
The finished chocolate peanut butter Easter eggs. Aren’t they cute?!
Shaped peanut butter eggs, ready to chill before dipping them in chocolate.​
Shaped peanut butter eggs, ready to chill before dipping them in chocolate.

Instructions:

  1. Using a hand mixer, mix together peanut butter, softened cream cheese, softened butter, vanilla extract, and confectioners sugar until well blended. Mixture may be similar to crumbly wet sand, that’s ok, as long as it forms when molded.
  2. For a uniform egg size, use a small cookie scoop to scoop out the peanut butter mixture. Shape the ball into an egg shape and place on a baking sheet lined with parchment paper. If you want them to look similar to Reese’s eggs, flatten out the top of the egg shape a little. Once all the dough is formed into eggs, chill in the refrigerator or freezer until cold enough to dip into the melted chocolate.
  3. Once the eggs are cold and firm, melt your chocolate wafers in either a double boiler or the slowly melt in the microwave in a microwave safe bowl (I used the microwave method, I find it to be very easy) in 30 second increments until melted. I add in a teaspoon of salted butter to the chocolate. When the chocolate is melted, smooth, and shiny, get your chilled eggs out and coat each one into the melted chocolate and place on a rack to allow the access to drip off.
  4. Decorate the eggs while the chocolate is still warm so that the sprinkles and adornments adhere. Cool the coated eggs in the refrigerator or freezer until the chocolate sets. Store eggs in the refrigerator in an airtight container. You can also freeze the eggs in an air tight container.

Enjoy! These are so yummy and such a great treat!

Please let me know what eggs do you like to eat or make? What Easter egg flavors should I make next? Let me know in the comments! Some ideas are lemon cream, raspberry cream, strawberry cream, orange cream, vanilla buttercream, chocolate cream, mint, tahini buttercream, and coconut cream, so many different flavors to choose from!

Please like, share, and follow. Please also Follow my page on Facebook and Subscribe on YouTube. Thank you!


BBQ Boneless Pork Chops in the Ninja Foodi Air Fryer

Barbecued boneless pork chops in the Ninja Foodi cook up so fast! These are perfect for a flavorful and quick weeknight meal.

BBQ Boneless Pork Chops in the Air Fryer
BBQ Boneless Pork Chops in the Ninja Foodi Air Fryer
Watch me make BBQ Boneless Pork Chops in the Ninja Foodi Air Fryer ⬆️

Ingredients:

  • Boneless pork chops
  • Garlic powder, to sprinkle on the pork
  • Avocado oil
  • Sea salt
  • BBQ sauce, I used Pioneer Woman’s Frontier BBQ Sauce

Instructions:

  1. Preheat the sear plate in the Ninja Foodi air fryer. Season the pork chops with garlic powder and sea salt.
  2. Also drizzle the pork with avocado oil to keep from sticking to the sear plate.
  3. When the sear plate is up to temperature, drizzle some avocado oil onto the sear plate and add the pork chops. Put the temperature probe into the largest pork chop.
  4. When the temp is about 20 degrees away from cooking, baste the boneless chops with barbecue sauce.
  5. Continue cooking until pork reaches done temperature of 140°. The Ninja Foodi will shut off once the pork chops are done.

Enjoy!

Please like, share, and follow. Please also Follow my page on Facebook and Subscribe on YouTube. Thank you!


Hutch Redo With Peel and Stick Wallpaper

Update the look of a piece of furniture with wipeable peel and stick wallpaper. This project took no time at all and I was super happy with the finished look of my updated, refreshed dining room hutch.

Hutch redo with peel and stick wallpaper​
Hutch redo with peel and stick wallpaper
Watch this Hutch redo with peel and stick wallpaper on YouTube ⬆️

The two end panels in my dining room hutch were covered in a burlap fabric. Over time, the fabric yellowed from sun exposure. I decided I would give the hutch an updated look and pondered what medium I would use to update it. Rather than fabric, I decided to use wipeable peel and stick wallpaper. The longest part of this project was removing the old burlap fabric. The rest was so easy and I am super happy with the results!

I used peel and stick wallpaper that I purchased from JoAnn. The brand I chose was NuWallpaper. They had different patterns, but I chose one that matched the color of my hutch best (an off white) and a pattern that I liked. I simply traced the shape of the panel, making it a couple inches larger, so I could wrap the panel. Then I cut it out, removed the backing, and slowly pressed it onto the panel. If there were any air bubbles, I gently used a straight edge to work the bubbles out.

I like that the wallpaper is wipeable, because the hutch is in our dining room where we eat all of our meals. I have 3 kids, so I appreciate being able to wipe it down.

The peel And stick wallpaper is awesome! I am already thinking about what other projects I can use it on.

What have you used peel and stick wallpaper for? Please let me know in the comments.

Please like, share, and follow. Please also Follow my page on Facebook and Subscribe on YouTube. Thank you!


Crispy Cream Cheese and Pepper Jelly Wontons

Only 3 ingredients and you can have a delicious, crunchy, creamy, and tangy appetizer or snack ready in no time.

Crispy Cream Cheese and Pepper Jelly Wontons
Watch me make Crispy Cream Cheese and Pepper Jelly Wontons on YouTube ⬆️

Ingredients:

  • 1 package of Wonton Wrappers
  • One package of Philadelphia Cream Cheese
  • One jar of Stonewall Kitchen Red Pepper Jelly
  • Water, to use as “glue”
  • Oil spray, I used avocado oil spray

Instructions:

  1. Place a heaping teaspoon full of cream cheese on a wonton wrapper.
  2. Next, place a dollop of red pepper jelly.
  3. Use water to seal the edges of the wonton. I pinched all 4 corners in and pressed to seal.
  4. Place on parchment paper in the air fryer (I used my Ninja Foodi air fryer) and spray each wonton with oil spray.
  5. Air fry at 425° for 4 to 5 minutes, or until crispy and golden. CAUTION: BE SURE TO LET THEM COOL BEFORE EATING, the jelly will be TOO HOT TO ENJOY RIGHT OUT OF THE AIR FRYER.
  6. Once cooled, Enjoy!

Please like, share, and follow. Please also Follow my page on Facebook and Subscribe on YouTube. Thank you!


Fresh Mozzarella, Roasted Red Pepper, and Pesto Sandwich

This delicious sandwich comes together so quickly and is full of flavor. I used my air fryer (only 3 minutes) to bake it, but pan fried, or a panini maker would work great too. For a quick, easy, delicious meal, try this!

Fresh Mozzarella, Roasted Red Pepper, and Pesto Sandwich
Watch me make Fresh Mozzarella, Roasted Red Pepper, and Pesto Sandwich on YouTube ⬆️

Ingredients:

  • 1 long hoagie roll, be sure to use a good, crusty roll for this, I used Liscio’s Bakery Rolls
  • Pesto, I used prepared pesto, Barilla Brand
  • Fresh mozzarella cheese, I got the pre-sliced log, Belgioioso brand mozzarella cheese
  • Roasted red peppers, I used jarred red peppers in water, Litaly Brand, dried them well and sliced them to fit the roll
  • Sea salt and pepper, to taste
Fresh Mozzarella, Roasted Red Pepper, and Pesto Sandwich ready to eat!

Instructions:

  1. Slice the roll, leaving a “hinge” on one side of the roll.
  2. Spread pesto on both sides of the roll.
  3. On one half of the roll, line up the fresh mozzarella cheese slices.
  4. On the other side of the roll, add the roasted red pepper slices.
  5. Dollop some more pesto on top of the fresh mozzarella cheese.
  6. Salt and pepper to taste.
  7. On a parchment lined sheet, cook on air fry mode in the Ninja Foodi Air Fryer for 3 minutes at 350°.
  8. Fold sandwich together and slice on a bias. Serve with chips, or a delicious side of your choice.

Enjoy!

Please like, share, and follow. Please also Follow my page on Facebook and Subscribe on YouTube. Thank you!